In the previous article I described the basics of emails; how they work; the difference between webmail and desktop mail; and a little about email software packages. Armed with that knowledge you can make perfectly good use of this popular facility. However, there is actually a lot more to emails than first meets the eye and many ways that you can improve the way you use them. If you would like to know more then this article is for you.
Here are the topics I shall cover:
Types of Email Address
We are probably all familiar with the usual email form that appears when we click to write a new email. The top of this form looks like this:
Here are the topics I shall cover:
- Types of Email Address
- Creating and using Address Groups
- Email Preferences
- Managing your Inbox
- Sorting your viewing page
Types of Email Address
We are probably all familiar with the usual email form that appears when we click to write a new email. The top of this form looks like this:
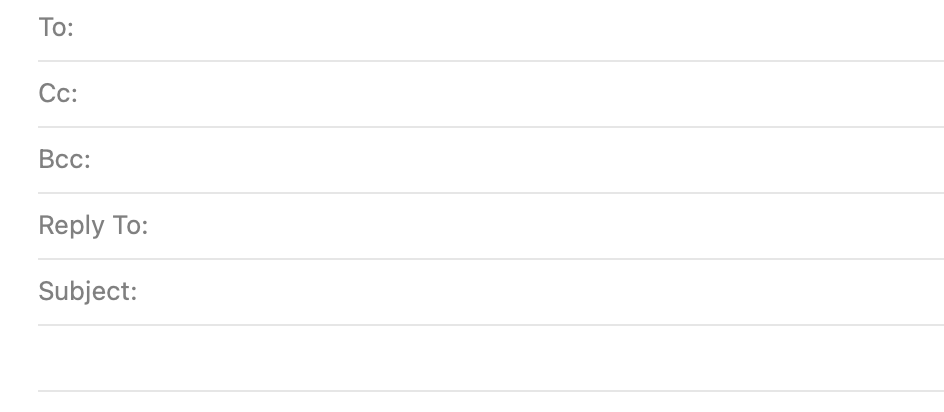
The To: box and Subject: are self-explanatory but you may not know what the others mean. Cc: stands for Carbon Copy and is just like an old typewriter letter where one or more pieces of carbon paper interspersed with blank paper enables you to create copies. Bcc: stands for Blind Carbon Copy. What is the difference between the two in email terms? Anyone whose address is in the Cc: box will receive a copy of the message as well as the person(s) in the To: box. Important point: All the recipients included in the To: and Cc: boxes will be able to see who else has received the email. This may not be appropriate so, if you want one or more recipients to be invisible to others, you should put the addresses of these (invisible) recipients in the Bcc: box. Not only will they be invisible to anyone in the To: or Cc: boxes but they will also be invisible to anyone else in the Bcc: box.
Note that you can still have addresses in the To: and Cc: boxes because there might be someone that you DO wish to let know that you have sent the email to the others shown.
Sometimes you might want to send an email to a whole group of people but not want ANY of them to know who else has received the email. In this case you can put your own email address in the To: box and everyone else in the Bcc: box (with no address in the Cc: box).
The Reply to: box (where it is set up to appear) will either have your own email address in or you can insert an alternative email address if you want replies sent to a different address. Any email received will always show a From: box and this will be the address of the sender. However, there might be instances where you wish replies to be sent elsewhere – either to someone else who is monitoring replies or to an alternative email address of your own so that you can separate all the replies to a particular message.
There should always be something in the Subject: box. If not, you will get a message pop up saying that there is no subject and asking if you still want to send it. You can do so (without a subject) but be aware that many email providers flag up messages without subject lines as potential spam or hoax emails.
Creating and Using Address Groups
If you have just a few people to send emails to it is easy enough to put their email addresses in one by one. Usually, if you have emailed them before, their email address will pop up as soon as you start typing their name.
Sometimes however, such as if you are managing a society or group of people, you might have a large number of people to whom you want to send the same email. Let’s say you have 50 people in the society. You could type each of their addresses into the To: box but this would take forever – especially if you are likely to send another message soon after to the same people. We get around this by creating Groups in our address book. Thus a group called (for example) “My Society” might have 50 names in it. Once you have created the group it is a simple matter of typing in “My Society” in the To: box and all the names will suddenly appear. Don’t forget to use the Cc: and Bcc: boxes in the same way.
Note that there is a limit to the number of addresses that email packages will let you send at any one time and this can be up to 80-100. There are other types of programme to use if you regularly go beyond this.
I shall not go into the subject of how to create groups as this varies considerably depending on the email package you are using. If you want to know how to do it, use Google and type in your email package name and ask how to create email groups.
Email Preferences
All computer programmes have the facility to adjust settings to suit your own way of working. These changes are accessed by finding the section of the programme called ‘Preferences’ (sometimes ‘Customise’ or 'Options'). Email programmes are no different with the exception that there are often a lot of potential changes you can make. I don’t intend to go into details on this here because not only are there so many different variations but each email software package will have its own set of permissible changes. However, here is a list of the kind of changes you can make (there will be many more than shown here):
Managing your Inbox
Depending on how many emails you receive and send you may be happy just to let your inbox (and sent messages box) grow and grow. There are several reasons why this is not such a good idea. First, before long you will find that you have to scroll down the screen a lot to find an older message. Second, it keeps messages jumbled up together without any separation between different topics (such as shopping, social, outings, bills etc). Third, it makes it difficult to quickly find all messages on a specific topic or at a given date.
For these reasons it is preferable to create separate folders to hold all emails of a particular subject or from a particular person or persons. There is no limit to the number of folders you can create and each folder can have sub-folders. Here is an example taken from my own email package. You can see that I create what I call Archive folders and allocate one to each year. Within that year I have sub-folders for messages In and messages Sent. All messages will go into the appropriate folder unless I wish to keep a separate folder for the more numerous emails. (Guess who uses Amazon quite a lot!)
Note that you can still have addresses in the To: and Cc: boxes because there might be someone that you DO wish to let know that you have sent the email to the others shown.
Sometimes you might want to send an email to a whole group of people but not want ANY of them to know who else has received the email. In this case you can put your own email address in the To: box and everyone else in the Bcc: box (with no address in the Cc: box).
The Reply to: box (where it is set up to appear) will either have your own email address in or you can insert an alternative email address if you want replies sent to a different address. Any email received will always show a From: box and this will be the address of the sender. However, there might be instances where you wish replies to be sent elsewhere – either to someone else who is monitoring replies or to an alternative email address of your own so that you can separate all the replies to a particular message.
There should always be something in the Subject: box. If not, you will get a message pop up saying that there is no subject and asking if you still want to send it. You can do so (without a subject) but be aware that many email providers flag up messages without subject lines as potential spam or hoax emails.
Creating and Using Address Groups
If you have just a few people to send emails to it is easy enough to put their email addresses in one by one. Usually, if you have emailed them before, their email address will pop up as soon as you start typing their name.
Sometimes however, such as if you are managing a society or group of people, you might have a large number of people to whom you want to send the same email. Let’s say you have 50 people in the society. You could type each of their addresses into the To: box but this would take forever – especially if you are likely to send another message soon after to the same people. We get around this by creating Groups in our address book. Thus a group called (for example) “My Society” might have 50 names in it. Once you have created the group it is a simple matter of typing in “My Society” in the To: box and all the names will suddenly appear. Don’t forget to use the Cc: and Bcc: boxes in the same way.
Note that there is a limit to the number of addresses that email packages will let you send at any one time and this can be up to 80-100. There are other types of programme to use if you regularly go beyond this.
I shall not go into the subject of how to create groups as this varies considerably depending on the email package you are using. If you want to know how to do it, use Google and type in your email package name and ask how to create email groups.
Email Preferences
All computer programmes have the facility to adjust settings to suit your own way of working. These changes are accessed by finding the section of the programme called ‘Preferences’ (sometimes ‘Customise’ or 'Options'). Email programmes are no different with the exception that there are often a lot of potential changes you can make. I don’t intend to go into details on this here because not only are there so many different variations but each email software package will have its own set of permissible changes. However, here is a list of the kind of changes you can make (there will be many more than shown here):
- Ways to view messages (i.e. show to the right or below the message list).
- Font, size and colour of text in the messages.
- Number of lines to preview in the home page.
- Check for messages automatically or not (Push or Pull).
- Play a sound when a message arrives.
- Action after a message is read (file, delete, implement a rule or nothing).
- What to do with junk mail and spam.
- Whether to include a sender’s message when replying to him/her.
- Whether to include a signature block (See later).
- Whether to apply any rules (See later).
Managing your Inbox
Depending on how many emails you receive and send you may be happy just to let your inbox (and sent messages box) grow and grow. There are several reasons why this is not such a good idea. First, before long you will find that you have to scroll down the screen a lot to find an older message. Second, it keeps messages jumbled up together without any separation between different topics (such as shopping, social, outings, bills etc). Third, it makes it difficult to quickly find all messages on a specific topic or at a given date.
For these reasons it is preferable to create separate folders to hold all emails of a particular subject or from a particular person or persons. There is no limit to the number of folders you can create and each folder can have sub-folders. Here is an example taken from my own email package. You can see that I create what I call Archive folders and allocate one to each year. Within that year I have sub-folders for messages In and messages Sent. All messages will go into the appropriate folder unless I wish to keep a separate folder for the more numerous emails. (Guess who uses Amazon quite a lot!)
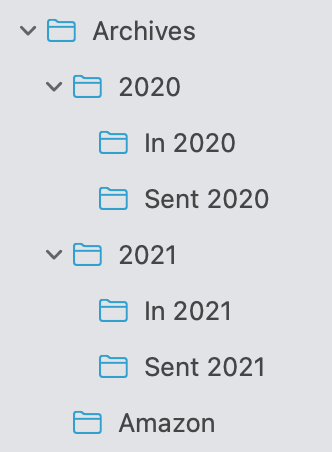
Where to keep these folders? If you remember the earlier article where I described the difference between desktop mail and webmail, you will know that you can keep these messages on your desktop/laptop or in the internet on your webmail package. For both methods you need to take specific action to MOVE selected messages into the appropriate folder. (Note that you must create the folder first). You can do this either by manually selecting one or more messages and then dragging them to the correct folder; or you can create a Rule that must be followed under specific circumstances. (More about this in my next article).
Remember that there is no need to delete every message as soon as you have read it. Emails don’t take up that much space and, if you have them in separate archive folders, you can always save these to external storage if you are worried about space.
Sorting your viewing page
Quite often people ring me to say that they have “lost all their emails”. Invariably the reason is that they have inadvertently altered the order in which they are displayed. In fact it is very easy to do and, fortunately, just as easy to correct it. In the box where all your emails are displayed will be something like this which is my inbox on Thunderbird Desktop software (different email packages may vary):

On the left-hand side will be the list of your email folders. (If this is not present you can make it visible by clicking on the ‘View’ option in the menu and clicking “Show Folders’). At the top of this column will be the name of the email account followed by the pre-assigned folders for the usual boxes. Note that, next to my email address there is a downward facing arrow and, similarly, next to the faint heading ’(Gmail)’. These downward facing arrows are important and feature a lot in email displays (and other software packages also). Clicking on the arrows in this column will cause the mailbox headings (Inbox, Deleted) to collapse and all you will see will be the single headings showing your email account and the Gmail title. The arrow will change to a right-facing one > which is the indication that the folders beneath it have collapsed. Clicking the arrow again will restore the folders.
Looking on the main panel you will see a range of headings thus (again they will very according to your email package):
Looking on the main panel you will see a range of headings thus (again they will very according to your email package):

In my example the standard headings are Subject, Correspondents (or Senders) and Date. To the left is a black asterisk * and a paperclip symbol. The asterisk relates to those messages that you have ‘flagged’ as important. In the column below this black asterisk there appear blank asterisks. All items that have been flagged will be filled in with a colour. By clicking on the black asterisk at the top of the column, you can re-arrange ALL the email into order showing either all the flagged (asterisked) messages first or (click again) and they will appear last. All the other detail related to that email will be correspondingly re-arranged.
Next to the asterisk is the paperclip which symbolises that an email message has an attachment to it (such as when someone send you a photograph attached to their email). Just like the asterisk, clicking on the paper clip will rearrange all the emails into order with all those messages with attachments listed first. Click again and they will be shown last.
Now, following the same principle, if you click on any of the other headings all the messages will be rearranged in order. With Subject, one click will put them into alphabetical order A-Z whilst a further click will change them to Z-A. You may need to scroll up and down to find the messages at the bottom of the rearranged list. With Correspondents or Senders the names of your senders will be re-arranged in alphabetical order A-Z or (another click) Z-A. Similarly, with Date you can sort the emails into Oldest first or Newest first.
What usually happens, therefore, when someone tells me they have “lost their emails" is that they will inadvertently have clicked on one of these headings and altered the order in which the emails are displayed.
Summary
I must apologise for the fact that this article is a bit complex. It is difficult to explain the variations between different email packages without going into detail on each one. Therefore I have used a typical package (Thunderbird) to demonstrate the principle. I am not necessarily recommending that you should use it
Look out for the final article on emails in which I shall cover four remaining topics:
- Writing Style
- Using Signatures
- Using Rules
- Hidden Information
